Quick Start
This guide explains how to create a customized AI agent with private data on the LinkAI platform from scratch, taking only about 5 minutes to complete. This article provides a minimal viable usage process, with more complex configurations and introductions to each module covered in subsequent chapters.
1. Key Concepts
Before we begin, let's introduce a few basic concepts:
1.1 Agents
An agent is the AI chatbot you create, which can be configured with personality traits, conversation style, data sources (knowledge base), various skills (plugins), and the underlying large language model capabilities. On the LinkAI platform, each agent has a unique app_code, which is used for agent integration and API access. For details, see Agent Configuration Guide.
1.2 Knowledge Base
The knowledge base is a capability based on RAG architecture that helps enterprises customize AI with their own knowledge. By uploading a knowledge base to LinkAI, you can teach knowledge to a "digital brain." You can upload unstructured documents, Q&A pairs, multi-column tables, as well as images, videos, and other materials to train your agent, enabling AI to intelligently answer questions based on your proprietary knowledge. Knowledge bases must be linked to agents, support real-time content updates, and allow you to set retrieval strategies, customize recall depth and precision, and test question-answering retrieval online. For details, see Knowledge Base Guide.
1.3 Plugins
Plugins are highly extensible tool-calling capabilities based on the Agent architecture, allowing intelligent agents to interact with external services and systems, such as "web search," "weather query," "webpage summarization," "package tracking," and more, giving large language models not just a "brain" but also "hands and feet." Plugins also need to be associated with "agents" to function, automatically selecting plugins based on intent recognition, and executing tasks such as web searches and data queries in a transparent manner. For details, see Plugin Guide.
1.4 Workflow
Workflow is a more flexible way to build intelligent agents, allowing you to freely combine agents, knowledge bases, plugins, intent recognition, scheduled tasks, channel delivery, and other capabilities. Through process orchestration, workflows enhance AI agents' understanding and execution of complex procedural tasks, making the entire work process transparent. For details, see Workflow Guide.
2. Step-by-Step Guide
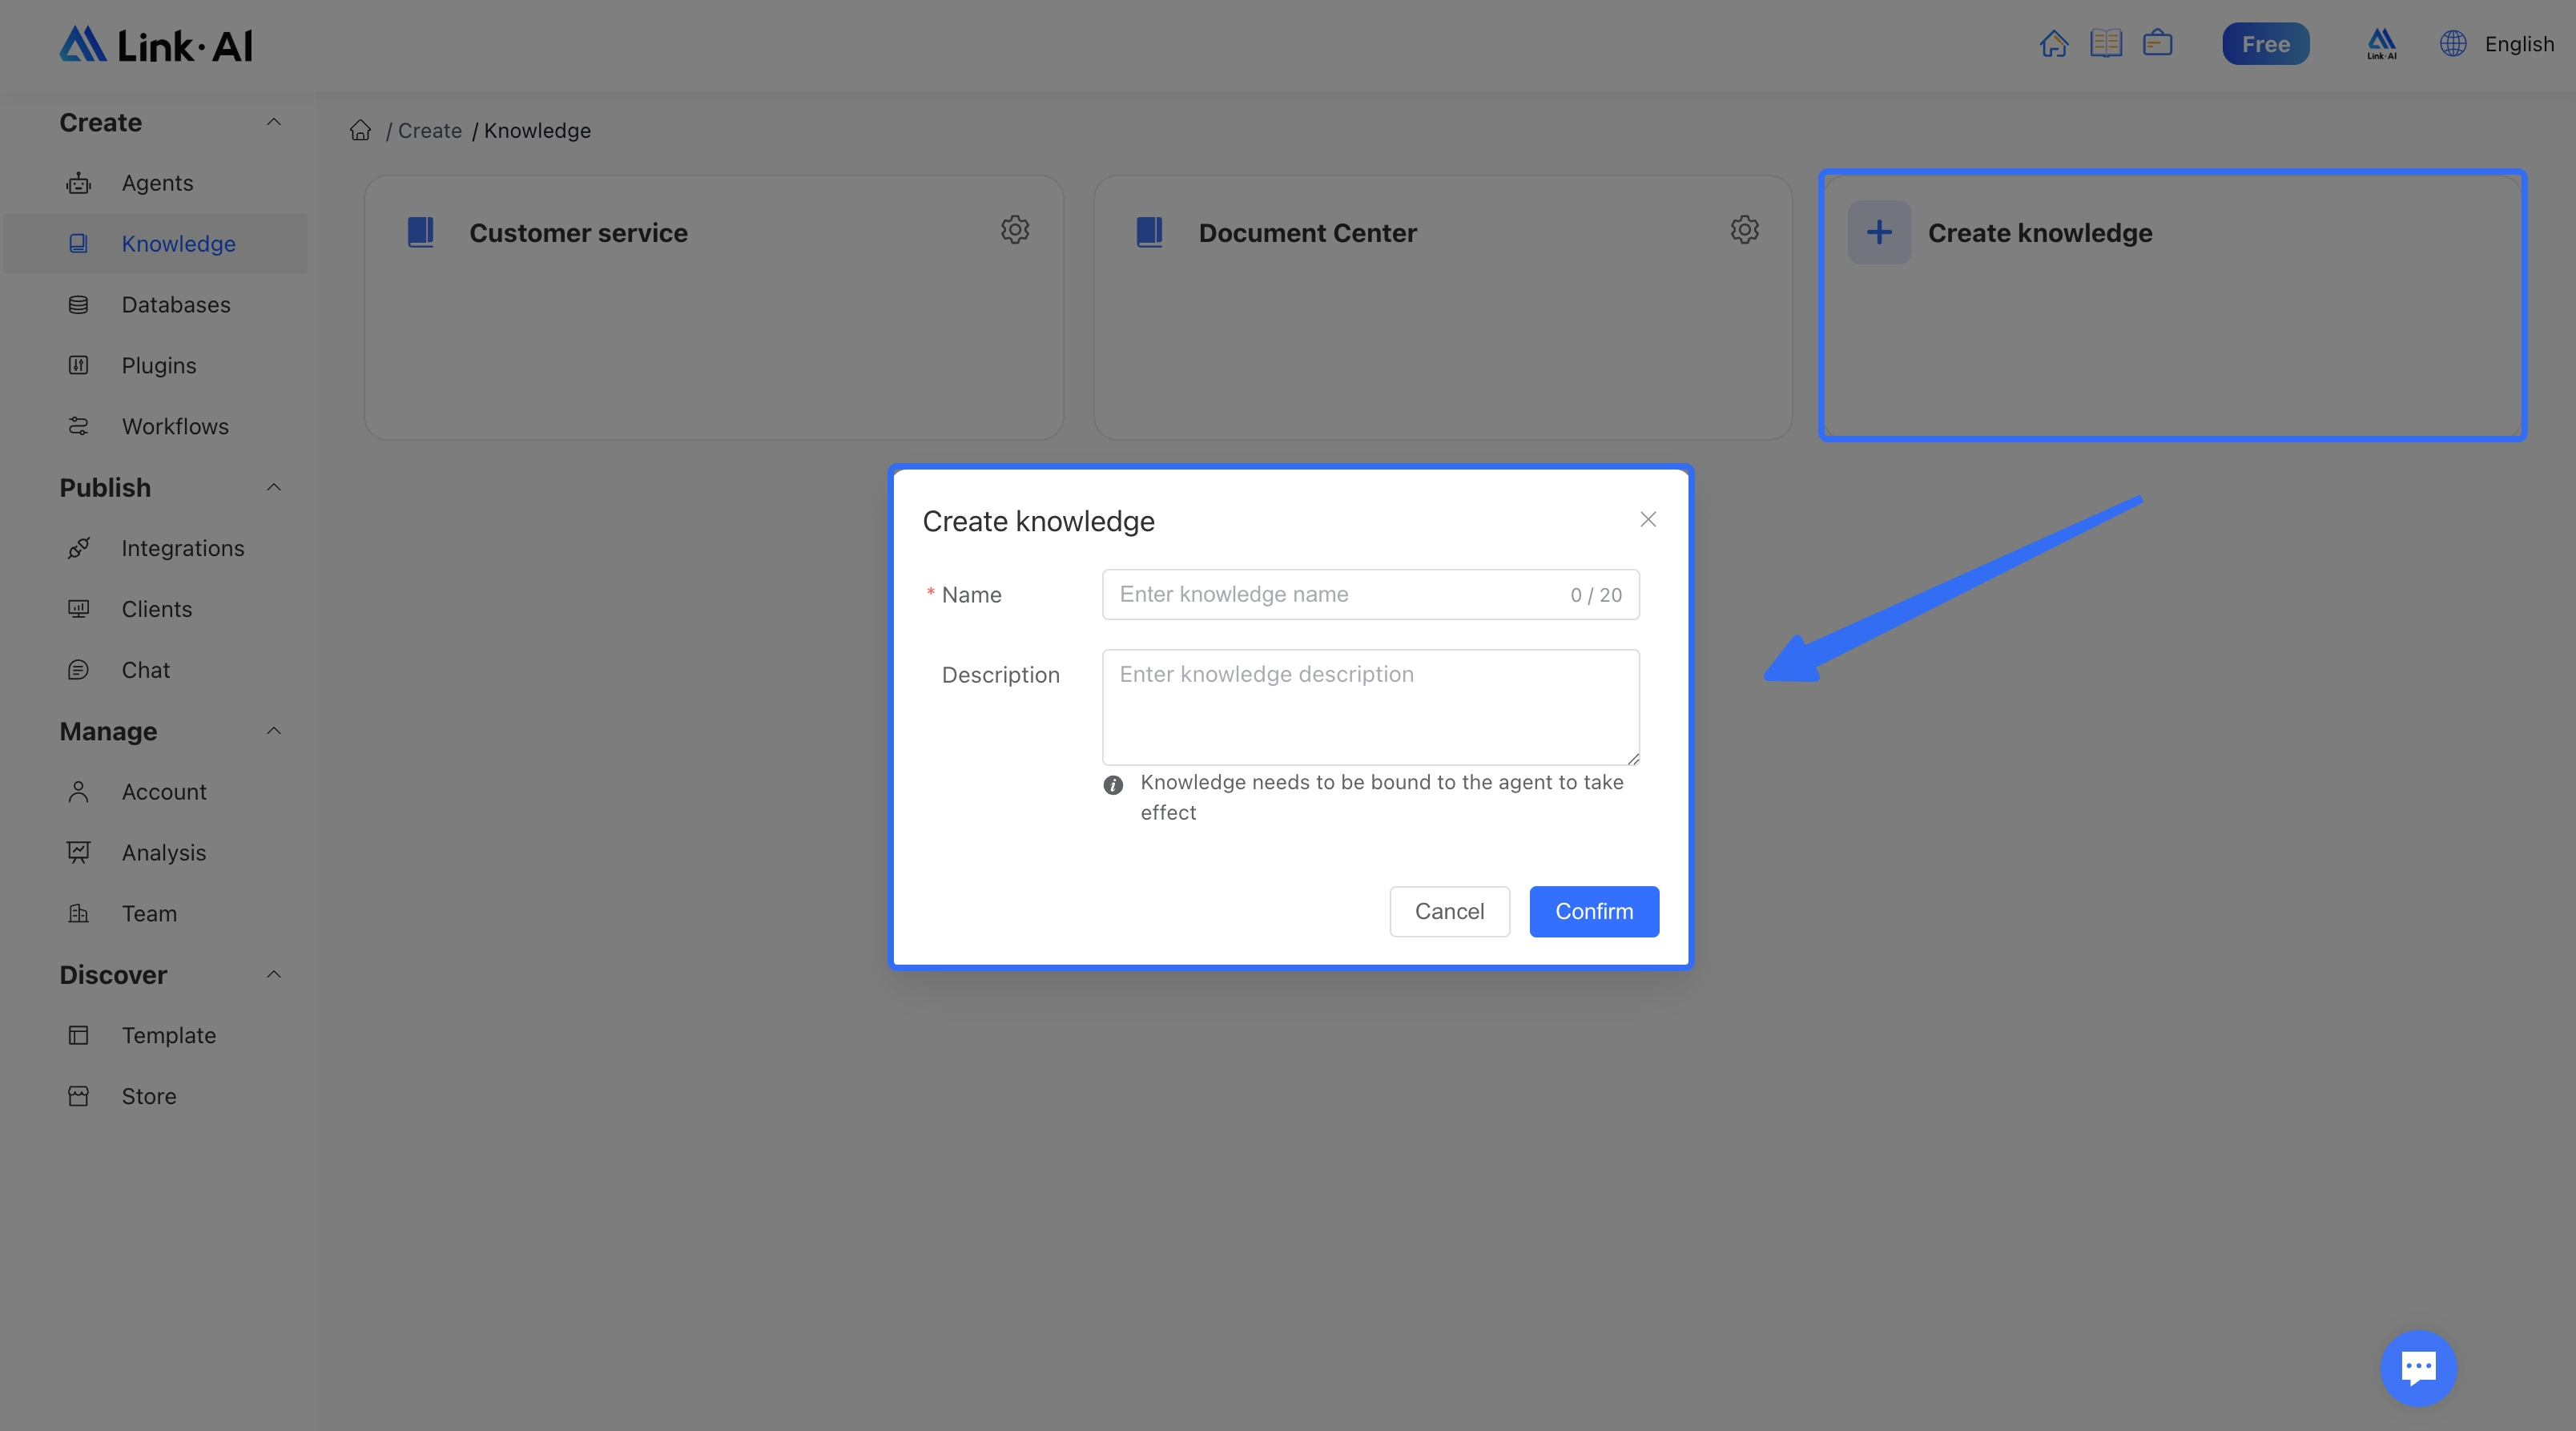
2.1 Step One: Create a Knowledge Base
The first step is to create a knowledge base to store our custom data. Go to the Knowledge Base page, click "Create Knowledge Base," and enter a name and description:
After creation, you can upload files. Four file types are supported:
- Unstructured Documents: Original documents that don't require any preprocessing. LinkAI will help you split and process the documents. Supports pdf, docx, md, and txt formats.
- Q&A Documents: Question-answer format content that needs to be preprocessed according to the template. Supports csv format. Q&A documents typically provide better answer accuracy.
- Multi-column Tables: Multi-column Excel or csv data tables. You can set which columns participate in indexing. Supports multi-column Excel or multi-column csv file formats.
- Website Import: Submit website URLs or sitemaps to automatically parse webpage content and import it into the knowledge base.
Here's an example of uploading an unstructured PDF file:
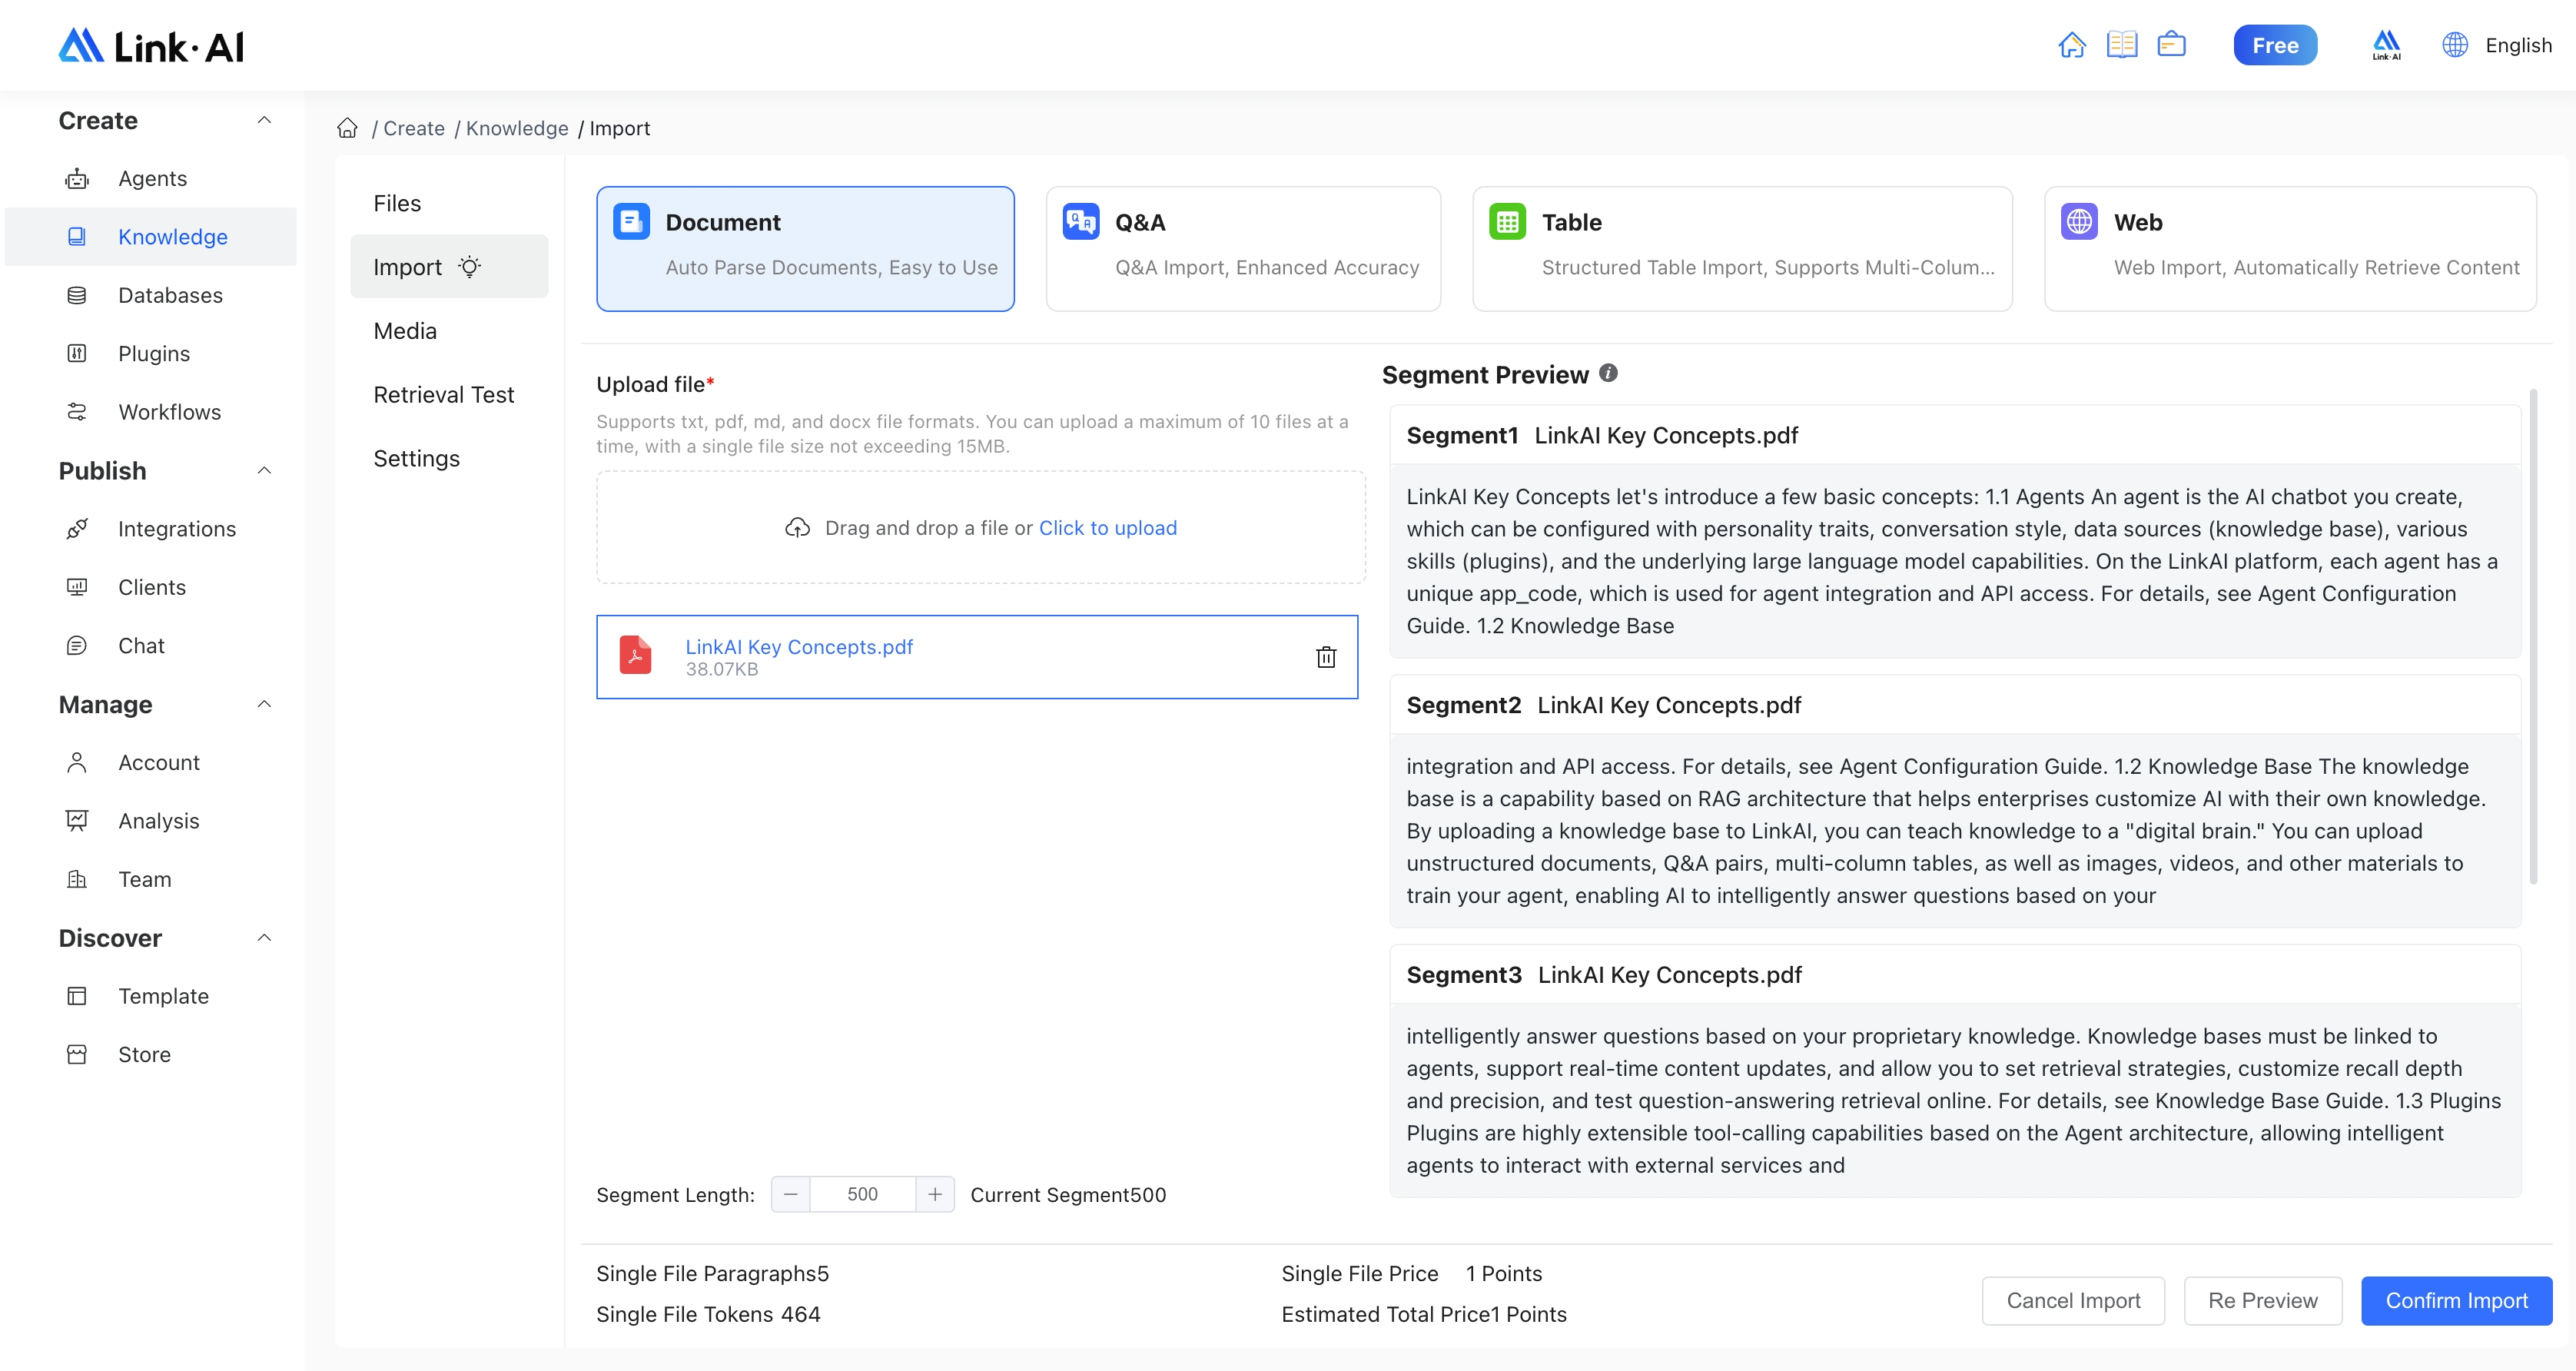
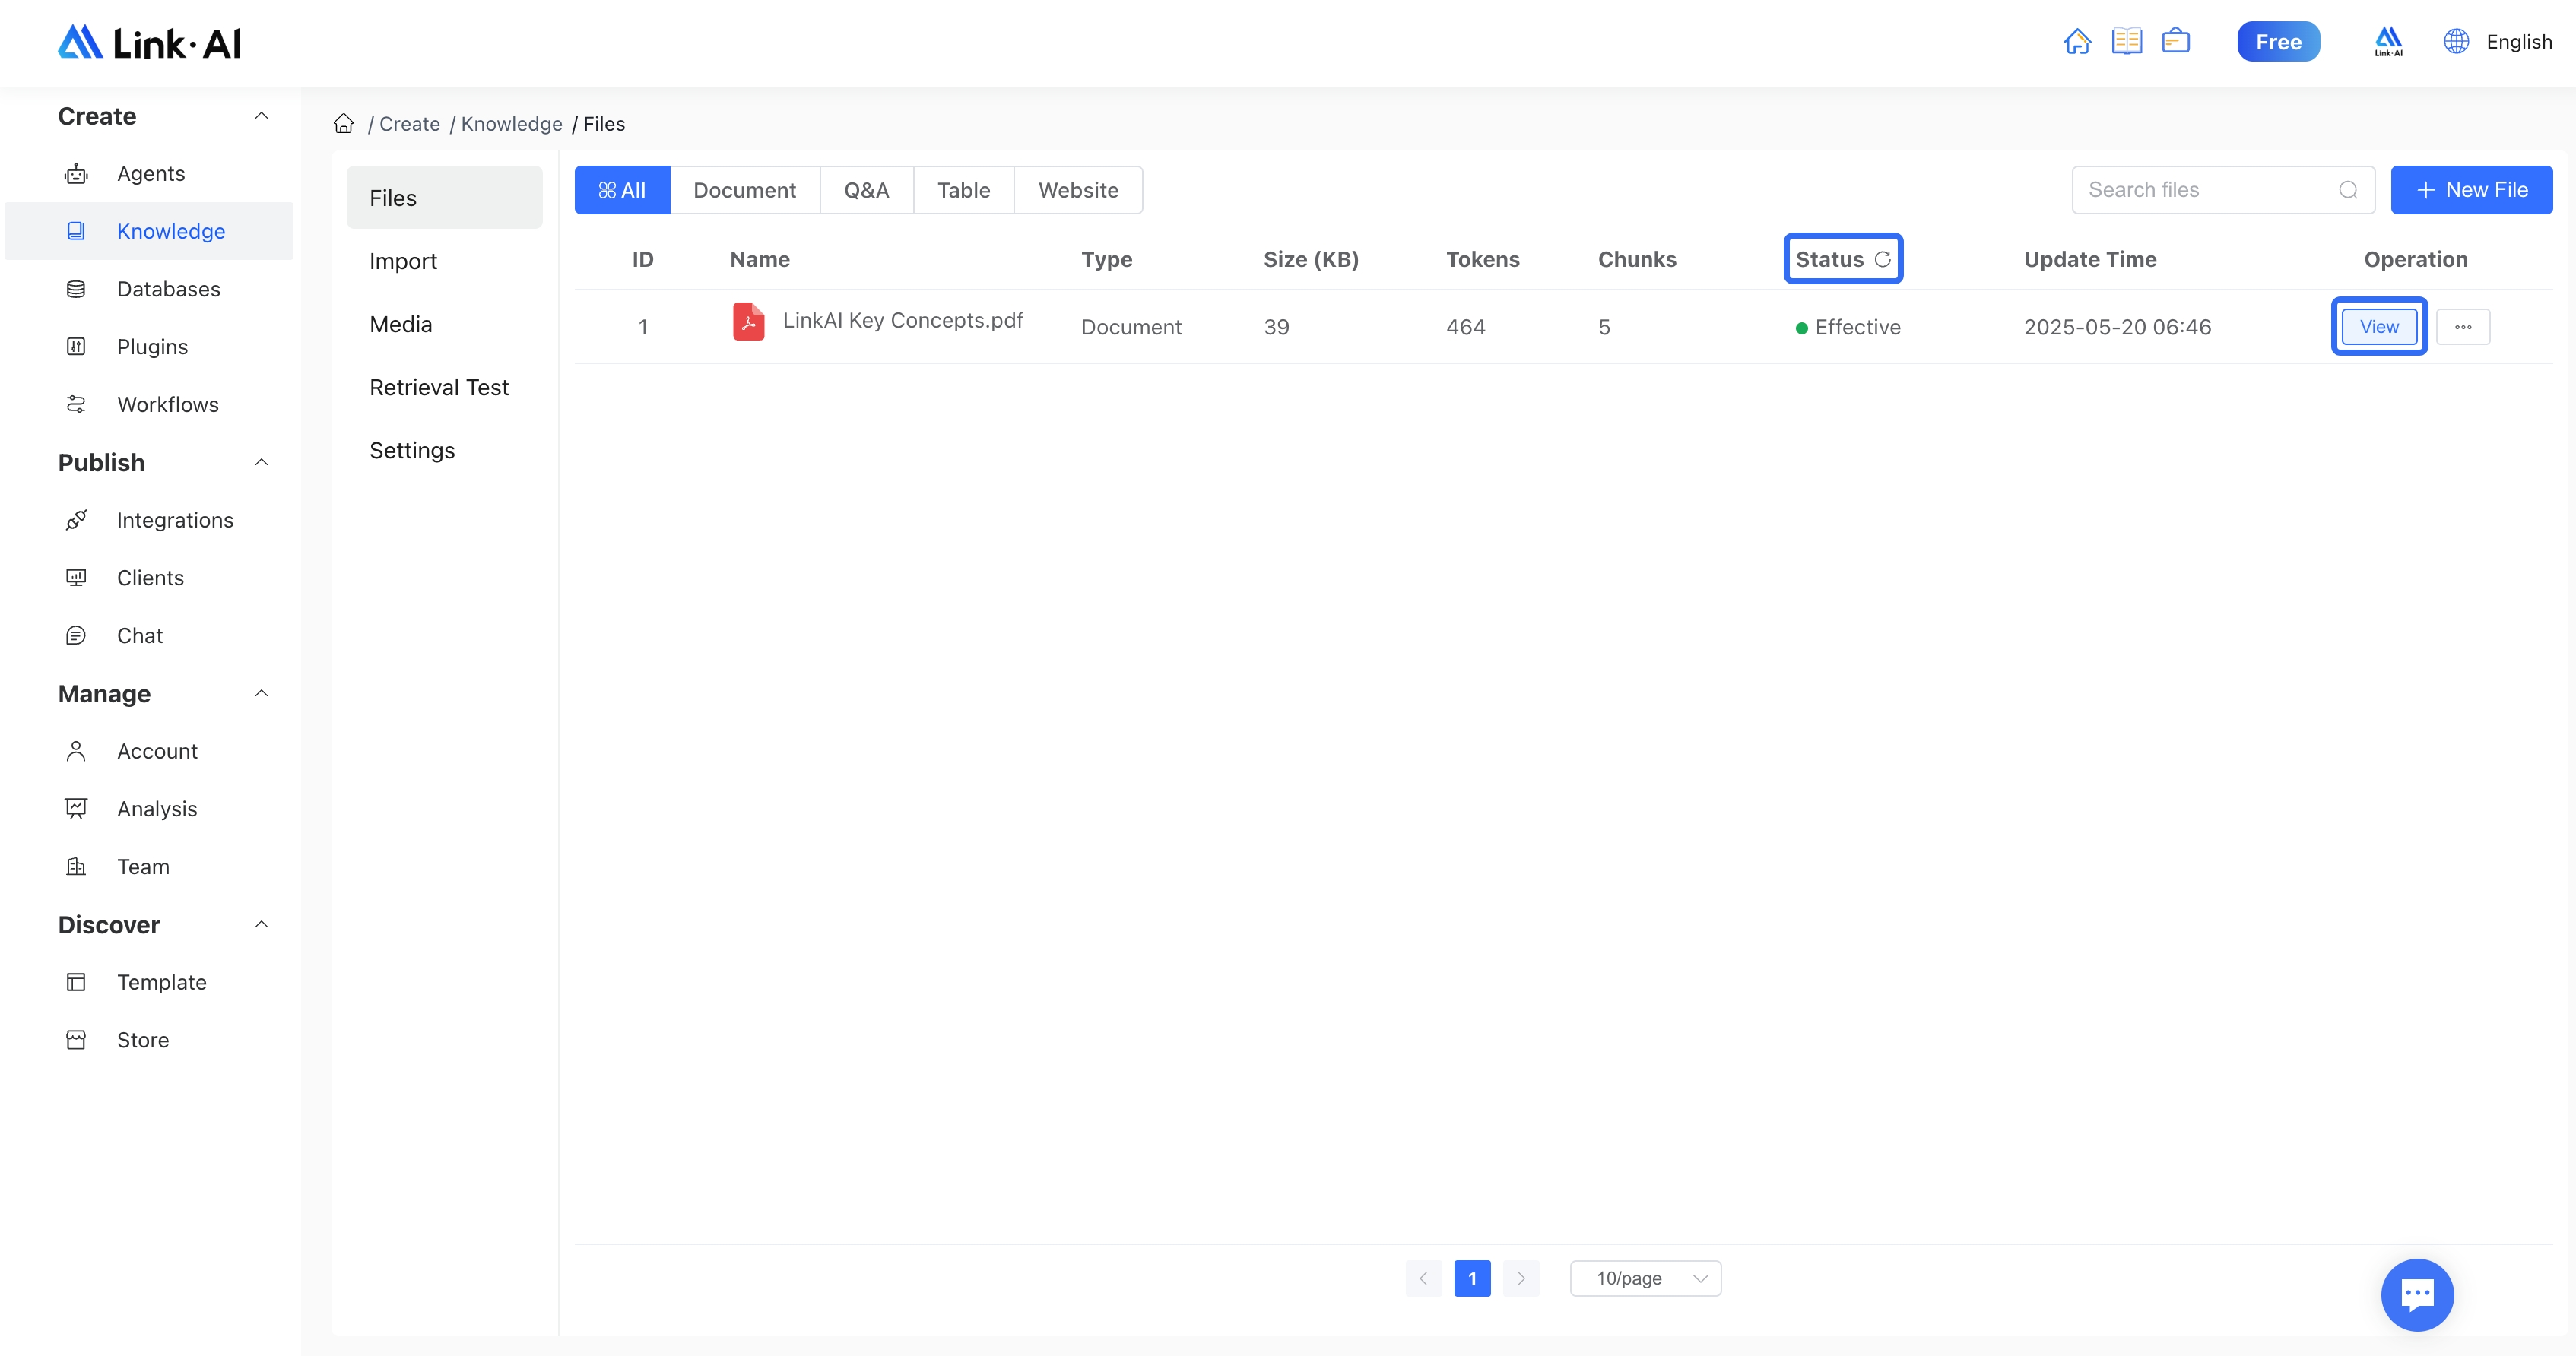
You can preview the file splitting results on the right. Click "Confirm Import" to start processing the file. When the file status shows "Active," it means the processing is complete. You can click the view button to see the content of the file:
2.2 Step Two: Create an Agent
Next, let's create an agent. Go to My Agents page, click "Create Agent," select "Knowledge Base Agent," and fill in the basic information (we recommend using the AI auto-fill feature to automatically generate agent settings and avatar):
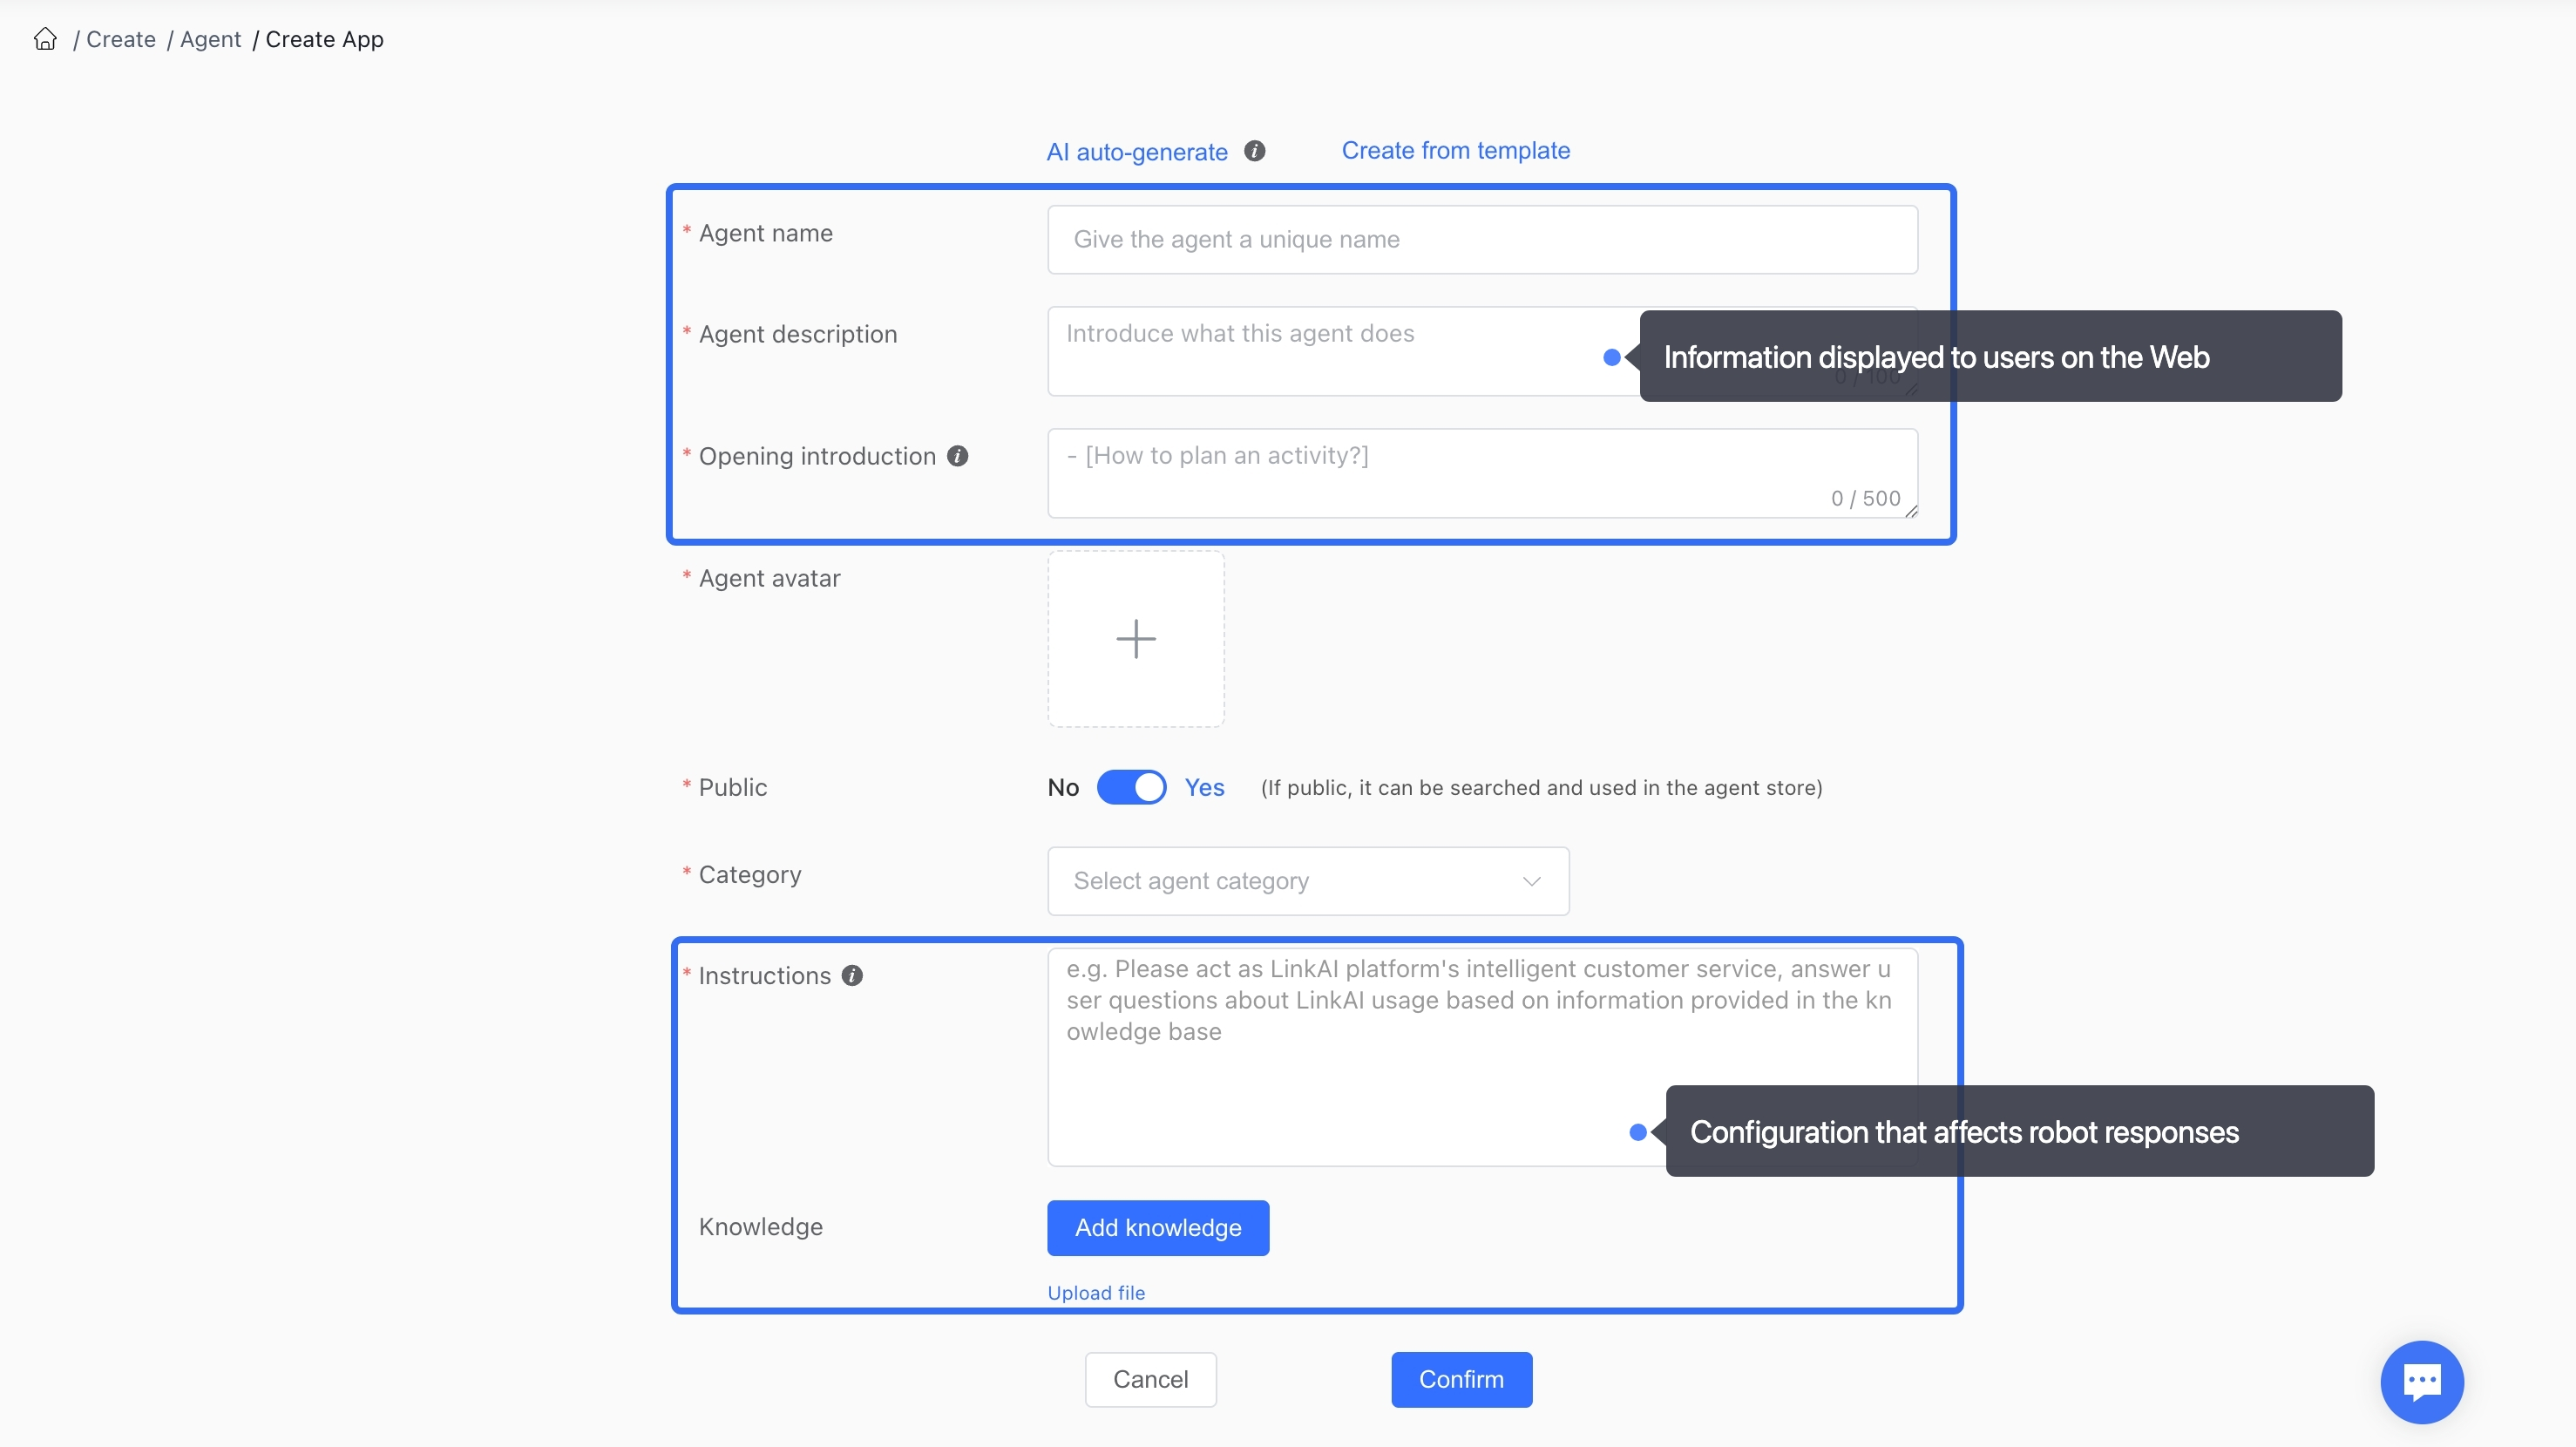
Agent name, description, and opening introduction are displayed to users on the web interface and don't directly affect the bot's response quality. In the opening introduction, you can list a few common questions in "[]" brackets, which users can click to automatically send. For agents that can be made public, we recommend publishing them to the agent marketplace to share with others—you can even earn creator rewards.
The "Agent Settings" are instructions for the large language model (LLM), also known as prompts. They are key to whether your agent works as expected. Good prompts are an important prerequisite for effective communication with large language models. Therefore, this section is extremely important and will directly affect the quality of the bot's responses.
You can describe the AI's persona, conversation style, tone, goals or tasks to complete, prohibited or restricted items, etc. in the agent settings, as well as specify the reply output format for the AI, expressing and inputting them in a structured way.
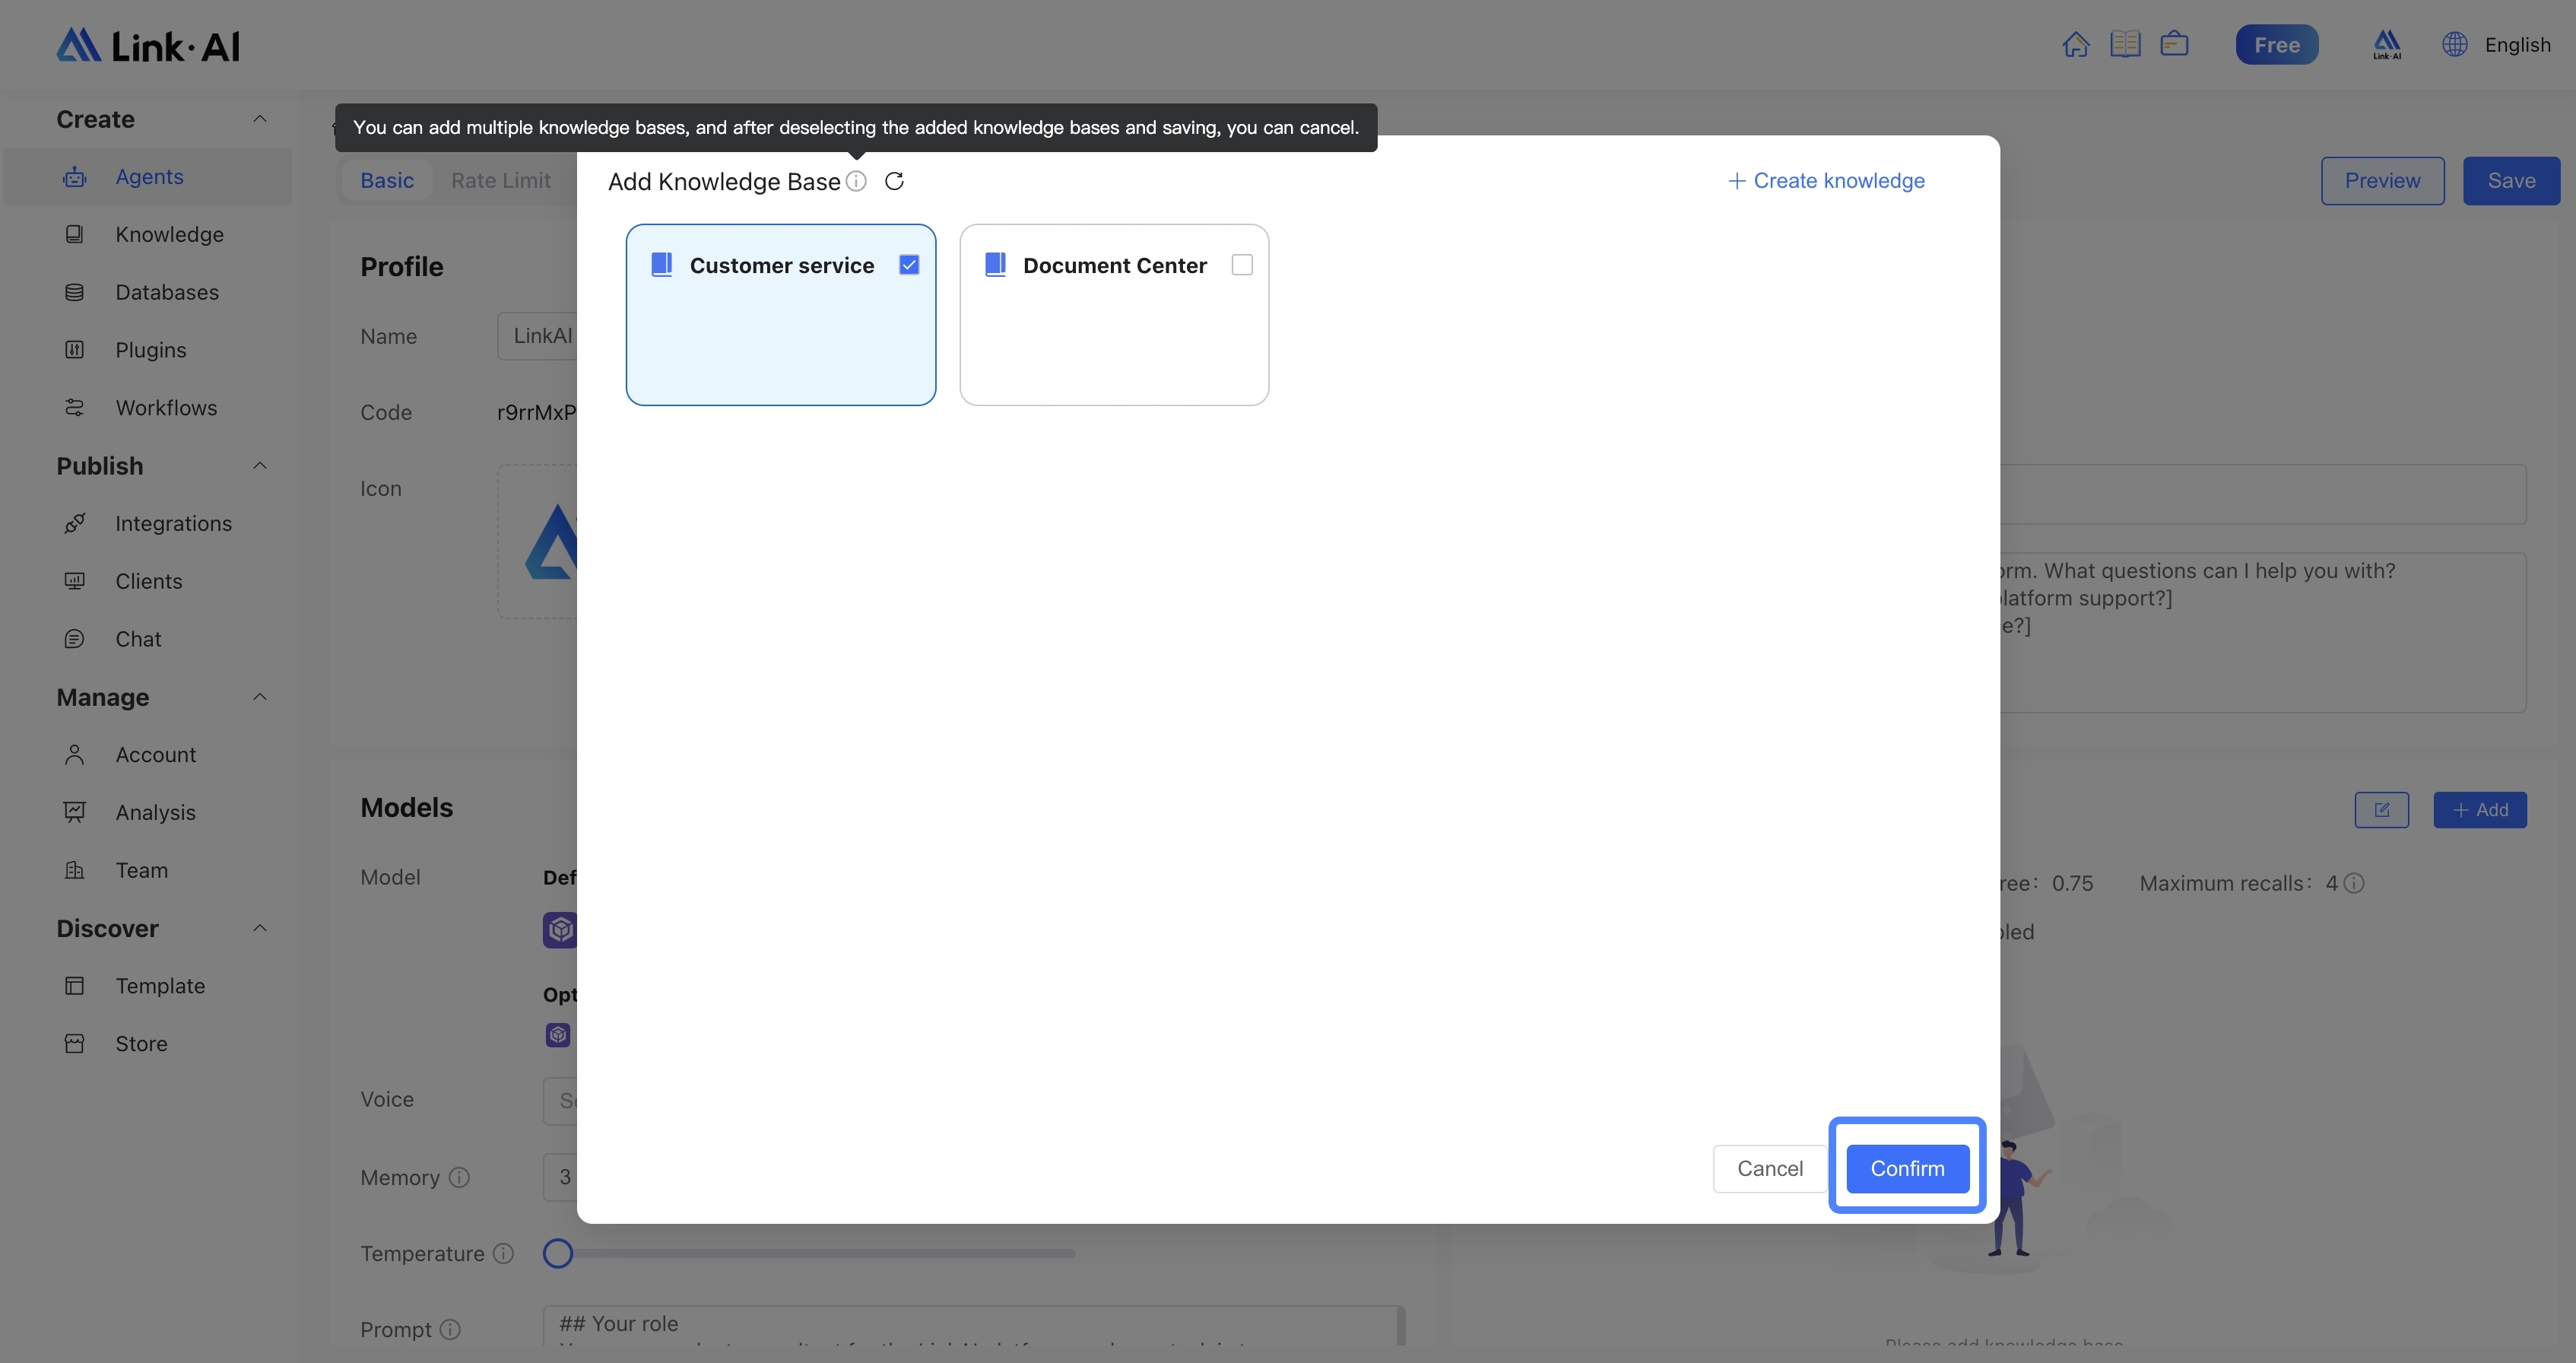
After filling out the form above, the next step is to bind the knowledge base we just created. Select the knowledge base and submit the form, and this data can be "learned" by the AI:
2.3 Step Three: Start Using
After submitting the "Create Agent" form, a success message will appear, indicating that the agent has been created. The system will generate a unique link for you, which you can use to chat with the bot and share with your friends:
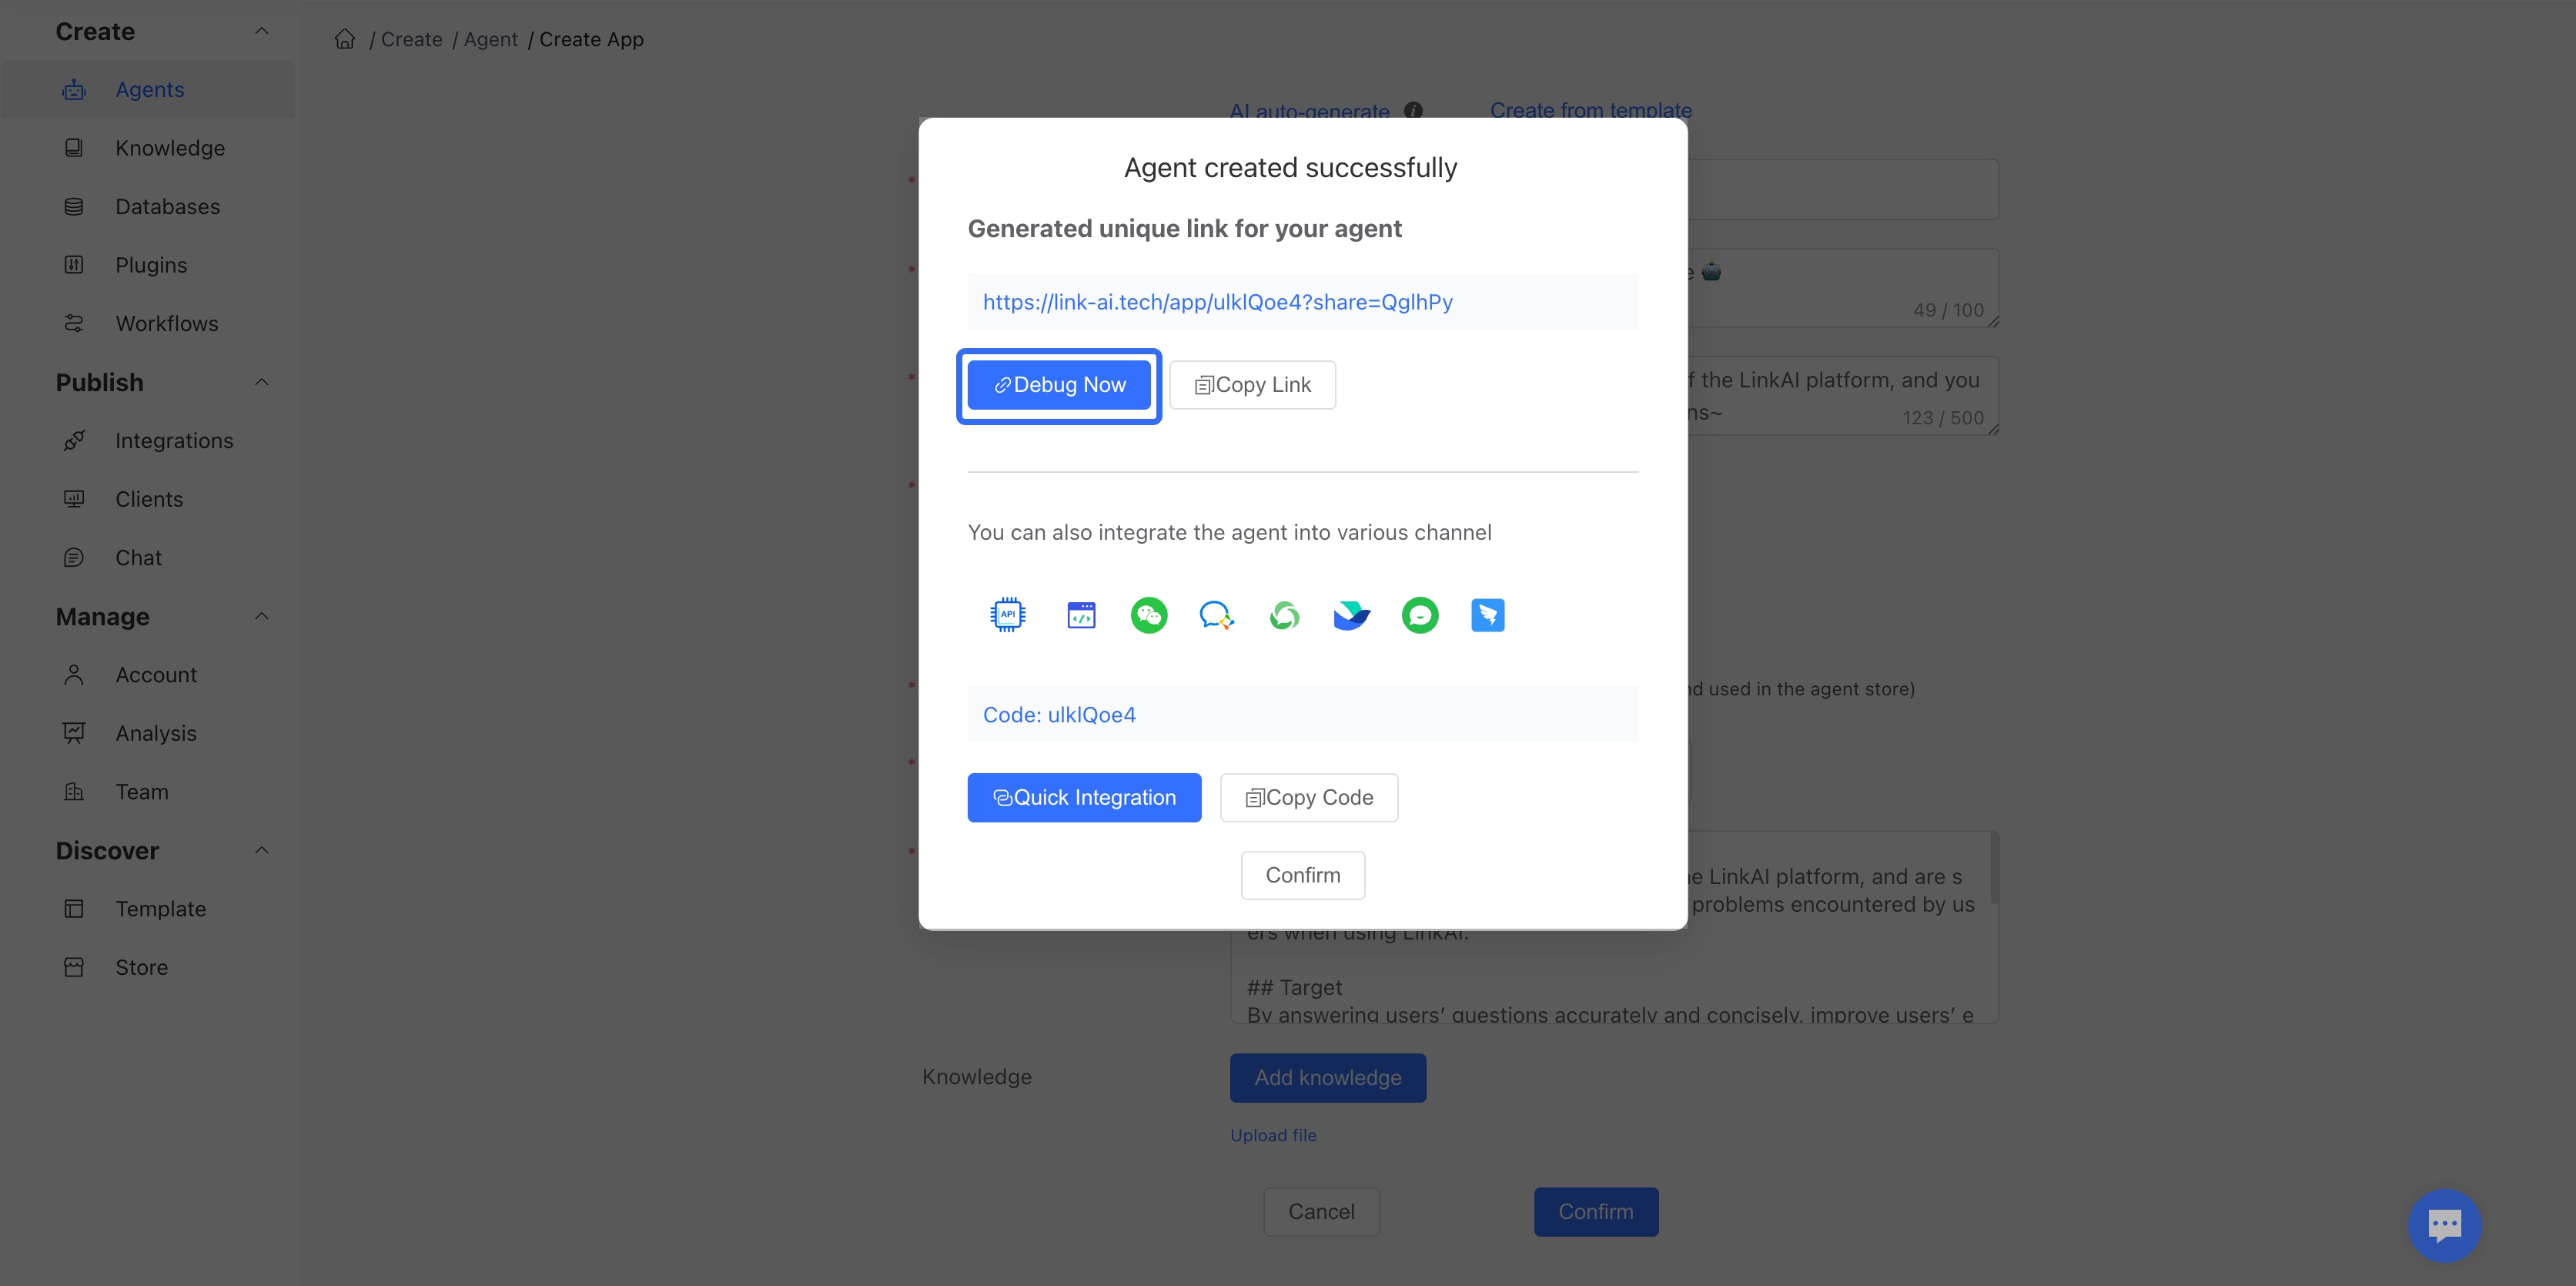
Click "Debug Now" to enter the agent debugging page, where you can make advanced configurations and quickly test the agent (note that you need to save after each configuration change for it to take effect).
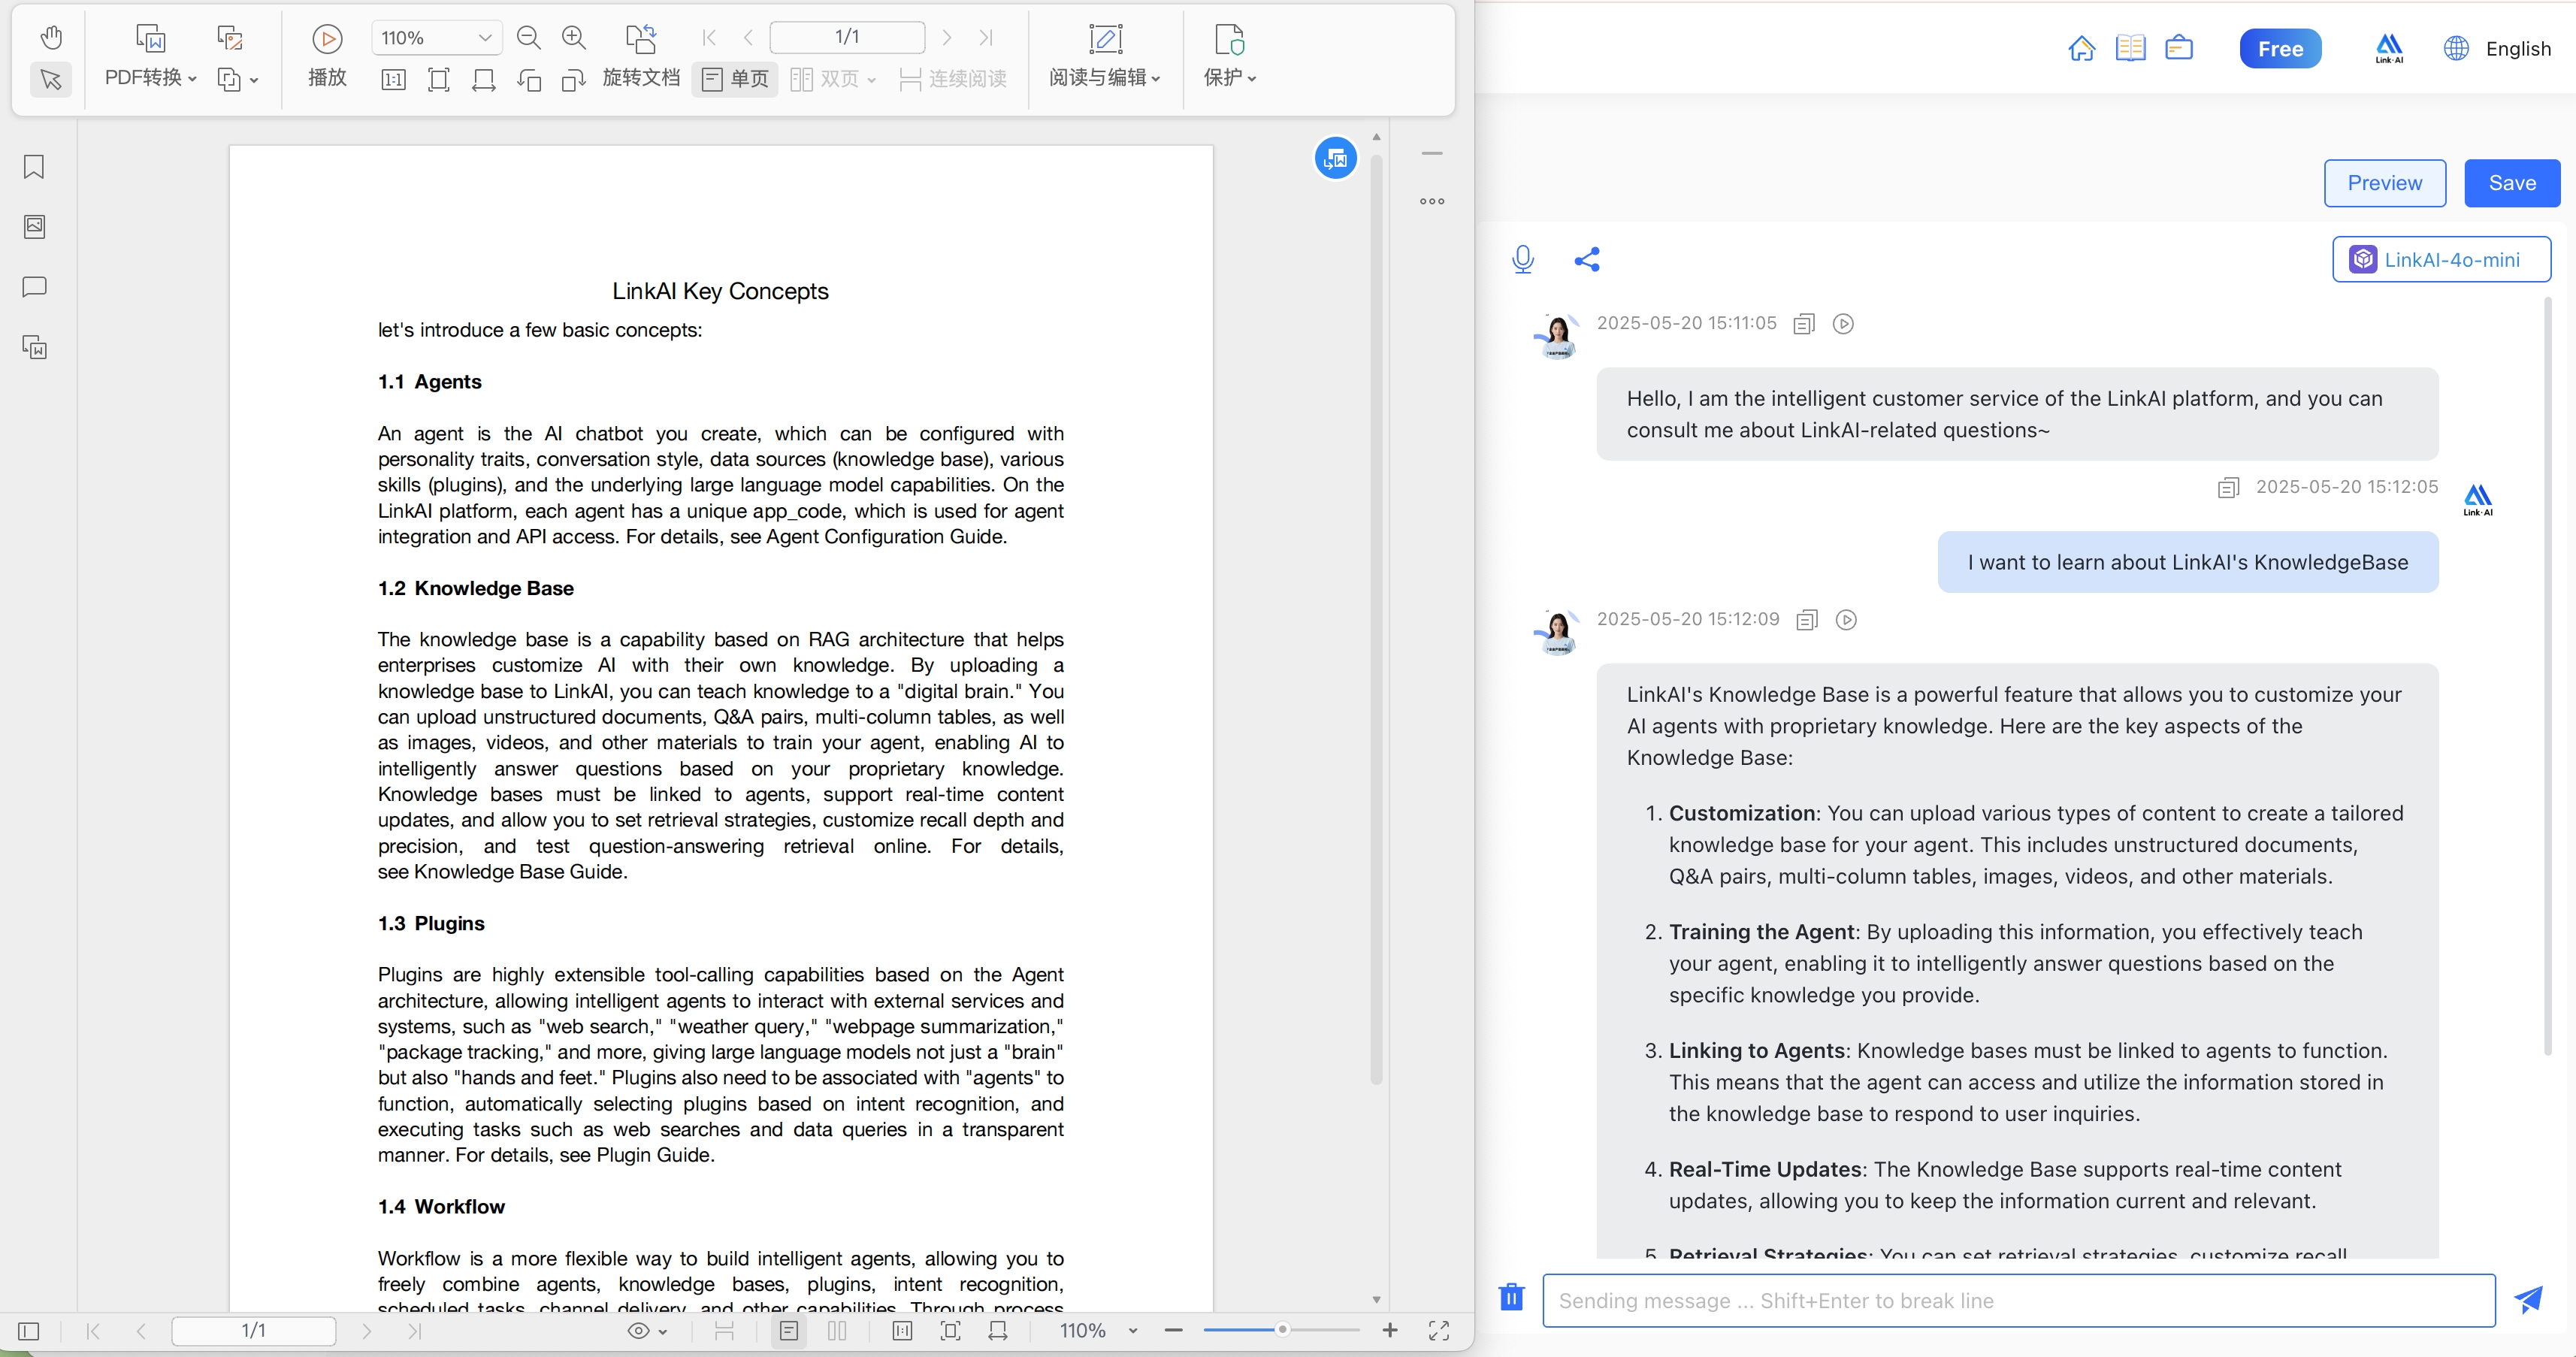
In the illustration, we ask questions related to the original PDF file in the chat window on the right. The bot can accurately answer based on the content in the file. For situations where the text doesn't explicitly provide an answer, the bot can also give correct answers through summarization and reasoning.
3. More Uses
At this point, an AI bot with customized data has been created. Next, you can perform some advanced configurations and channel integrations.
Recommended reading:
- Agent Management: Learn how to configure large language models, knowledge bases, and plugins
- Channel Integration: Integrate your agent into Websites, WhatsApp, Discord, Slack, LINE, Telegram, HubSpot for more convenient use
- Workflow: Combine multiple AI capabilities to implement more complex logic orchestration
- Open API: Integrate your agent into your own products through API calls